Monday 30 December 2013

Christmas Traditions - Making Cookies

With Christmas behind us and the need for holidays cards no longer dire, it is nice to get back to completing a scrapbook layout. I only started scrapbooking in the spring, so completing a page still takes me a few days (sometimes weeks) to complete.

Over at Two Scrapbook Friends the December Craft Challenge Christa made was to scrapbook a holiday tradition. For my family one thing that is becoming tradition is baking our favourite Christmas treats. For me, the one treat that I have to make each year is Rice Crispy chocolate peanut-butter squares. My mother always made these squares when I was a kid and they are a hit now for my family. The  Christmas for this layout (2011) was also a special one because our family was hosting Christmas. So I got to showcase a lot of great crafty creations for our family dinner celebration (see below).


The paper is from the Simple Stories December Documented collection. This has been my favourite of the season for sure. On my craft background I got a bit messy:

  • Sprinkled Mister Huey's (Dark Calico)
  • Added "chocolate finger prints" using brown Memento (Dark Cocoa) ink
  • Created a "floured" effect with white pigment ink. I also put the white ink on the bottom of an old gingerbread man cookie cutter and "stamped" that on the page.


The recipe folder I created myself and added the tabbed index cards for my journalling, which will include the recipe for my favourite Christmas treats. The small cookie cutter charm were in my stash, however I cannot remember where they were purchased from. 

The heart and star were cut from white card stock with my Cricut and the gingerbread man was traced from the cookie cutter and cut by hand. I coloured shapes using Copic markers. I then covered the shape with a glue (Zig two way glue pen) and added............you guessed it.....Glitter Ritz micro fine white glitter, to give the shape more of a cookie look. I then used white Ranger enamel accents to create the look of icing on the cookies.


The cookies part of the title was cut using the Sesame Street Friends Cricut cartridge.

Here are a few other pictures of my holiday creations from our 2011 Christmas celebration.


My BELIEVE banner.


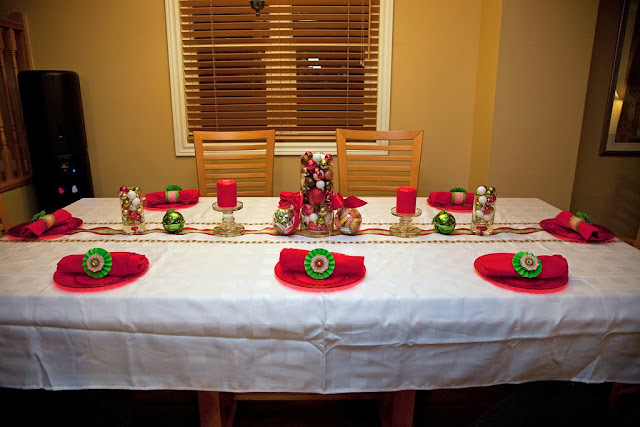
The table Settings.


 My napkin rings that were inspired by a posted by Shimelle Laine (here).


The kids helped make the paper filled Christmas baubles and I used large decorative ribbon for the runner on my white table cloth (tacked down with double sided tape).

My next Christmas hosting will be 2015, so I have plenty of time to plan!

Thanks for taking a peek at my Christmas traditions scrapbook layout.

Tracy

Saturday 28 December 2013

Last Christmas Card of the Season???

I managed to complete one last Christmas card that will go into my stash for next year. My card production has slowed a bit since I was given a nasty cold for Christmas. I do have a bit of time off from work next week, so I am looking forward to getting my crafty groove back.

For this card I used a digital image I purchased from Your Next Stamp (by Omni Designs) called Whispering Merry Christmas.


I had a lot of fun colouring the bunny with my Copic markers. For the little bird, I added a bit of Glitter Ritz fine white glitter to the trim of the hat.


I decorated the inside with patterned paper and used a 3x4 tag from the Simple Stories Snap Christmas for the sentiment.

Image: Digital image from Your Next Stamp by Omni Designs "Whispering Merry Christmas"
Paper: Doodlebug "Home for the Holidays" and "North Pole"
Dies: Nestabilities Postage stamp, MFT Dainty Bows

Challenges:
Little Red Wagon - #217 Merry Christmas! Anything Christmas
Papertake Weekly Challenge: Pick of the year - My selection for pick of the year was the recent challenge of Christmas Creatures
Cute Card Thursday: #301 Anything Goes
Your Next Stamp: #7 Photo Inspiration


Stay healthy my crafty friends and thanks for taking a peek at what I expect is my last Christmas card for the year!

Tracy

Monday 23 December 2013

Naughty? Nice?

This year December has felt a bit disorganized for me. Between work, shopping, decorating, crafting, wrapping, baking, creating, visiting, and of course all the other essentials (eating, sleeping, cleaning...........) it has been so hectic. I will be happy to have a bit of downtime over the holidays. I am hoping to get my craft space organized to prepare for an exciting new year of creating!

So since it is almost time for the big day most of the cards that I have created over the last few days are going to be tucked away in my card stash for next year. It feels pretty good to already have a jump on the 2014 season.

For this card I have returned to some of my seasonal favourites, which include:

  • Simple Stories December Documented
  • Kraftin' Kimmie (Joyful Holidays) designed by Cheryl Alger and
  • Glitter Ritz Micro fine glitter


I wasn't kidding when I said that I am trying to glitter everything in sight. Christmas and glitter go so well together. Using the white ultra fine glitter you can still see the Copic colour coming through. I added a small touch of glitter to the trim of her dress, sleeves and hair baubles.


Of course the inside of the card is decorated too. I used a sticker from the December Documented collection pack and the tag is from Simple Stories Snap Christmas.


The layout for this card is based on this sketch from Kraftin' Kimmie:  


Challenges:

Kraftin' Kimmie Stamps blog: # 210 Sketch

Papertake Weekly Challenge: Last Christmas

Happy crafting and wishing everyone a very Merry Christmas.

Tracy


Sunday 22 December 2013

Pretty Bauble

Well the weather outside is frightful for sure today. There is a layer of ice covering everything and the rain is coming down.  This to me is a great excuse to stay inside warm and dry. I have my potato bacon soup cooking in the crockpot and the family and I are enjoying a PJ day! I am enjoying a bit of crafty time too (of course)

My newest card I have mixed emotions about. I love how everything turned out, however it was such a challenge to get to this point. I think that is the "over-thinking" part of my brain that tries to take over from the "creative side". I messed around with colours, papers, and the image placement etc so many time until I was happy. I now have a large pile of scraps to play with, hopefully for some other cards that I will post soon. I really do love using 6x6 paper pads for my cards. That way if I change my mind (like I did 4 or 5 times here) I don't feel like I have completely wasted my supplies.

For this card, I dipped into my stash and pulled out paper from last year including Basic Grey Aspen Frost and MME All is Bright. I backed the pattern paper with brown kraft core card stock, which I distressed the edges. The pattern paper is inked with vintage photo Distress Ink.

The button is wood veneer which I added Tim Holtz Broken China distress paint, then inked the edges.


The digital image is called "Pretty Bauble" which I received as a blog hop gift from Your Next Stamp (she's so cute). I coloured the image with Copics. For the bauble, after colouring I added a layer of my Zig two-way glue and sprinkled my favourite Glitter Ritz fine glitter. You can still see a bit of the Copic colour coming through (which is what I was hoping for). I really love this glitter and after the success of the bauble, I have been trying to add glitter to everything. The glue pen is nice to use because of the fine tip, it gives a lot of control on where the glue is placed.


The sentiment on the inside is from a Hero Arts holiday set.


The layout for the card was inspired by the sketch for the Your Next Stamp December sketch challenge. Of course, I added my own touch with additional layers. What can I say, I love layers!


Challenges:

Your Next Stamp: December YNSFFCOO7 Sketch

Little Red Wagon: Non traditional Christmas Colours (I know there is a wee tiny bit red peeking out on the pattern paper, but the main focus is the browns and blues. I was really lacking in non-traditional colours in my holiday papers)

4 Crafty Chicks: 4CCC # 173 Distressing (ink to the edges, distressed my card stock (which is hard to see from the pictures) and the use of distress ink and paint on the button

Allsorts Challenge: Week 238/239 Brown - Blue - Aqua 

Cute Card Thursday: Challenge 300 Celebrations (of course decorating and celebrating the holidays)

Ribbon Carousel: RCC 88 Anything goes (using MME twine from All is Bright collection)

Simon Says Wednesday Challenge: Bling it on! (there is bling on the bauble using glitter)

Simon Says Monday Challenge: Stamp out 2013 - "Pretty Bauble" digital stamp.

Enjoy your day and happy crafting.

Tracy


Tuesday 17 December 2013

Good Grief It's Almost Christmas

This is one of my favourite Christmas cards that I made this year. My kids and I love to watch A Charlie Brown Christmas each year. It’s great to share this experience with my kids as I grew up watching it too. When I saw the digital image “Max’s Charlie Brown Tree” from Sassy Cheryl’s Stamp it was a must have.

For this card I used Simple Stories December Documented. This has been one of my favourites lines this season. The colours and patterns have been so fun to work with and I thought they went really well with the distressed look of my image.


The layout for the card was inspired by older Sweet Sunday Sketch (#159)

I coloured the image with Copic markers. I added Glossy Accents to the Christmas ball and my “go to” for creating snow, is running my Zig two-way glue pen over the area and sprinkling it with Glitter Ritz Micro Fine glitter.


For the inside of the card I used a Simple Stories Snap Christmas 3x4 card. There are so many great images and sayings on these cards. I love the 3x4 cards, but struggle to incorporate them into my scrapbook pages. Instead I use for embellishments in my greeting cards. 


I love the sentiment on this 3x4 card and it worked so well with the cute tree on the front. Of course I did have to explain to my daughters what tinsel is. Does anyone still use tinsel? Ah the memories of tossing it haphazardly at the tree and later mom going back and fixing it when we weren't looking.

Challenges:
Sassy Cheryl: #196 Favourite Sassy Cheryl Card. Since I am still new to blogging I didn't have a lot of older cards to go back to. So I decided on my favourite card that I created this year. 

All Sorts Challenge - Week 237 Snowflakes

Curtain Call: Sweet Snowflakes


Simon Says Monday: Stamp Out 2013

Papertake Weekly Challenge: Last Christmas

Cute Card Thursday: 299 Christmas Catchup (for me my catchup inspiration with this card is finishing up the rest of my house hold decorating).

Ribbon Carousel: RC88 Anything goes

Your Next Stamp: Snowflake inspiration photo


Thanks for checking out one of my favourite cards for the Christmas season. I have enjoyed my Christmas creations and am a bit sad to be tucking them away for another year (soon). I have lots of images still to use. I have a few favourites stamped out and hope to colour them in my free time (yeah right!) and use them next Christmas.

Happy creating everyone.

Tracy


Monday 16 December 2013

Snowman Soup!

So I definitely kicked things into gear this past weekend to tackle the "to do" list that has been growing since the start of the month. With a bit of extra fuel from my gingerbread latte, I am happy to say that I accomplished most of the "Crafty" elements of the list.

This weekend I had a bit of crafting time with my girls as we tackled a fun gift for their classmates and teachers. For this post we will focus on the classmates gift which was snowman soup. I got this fabulous idea from a former teacher who use to make these for her students.

The girls and I turned my craft area into a mini assembly line and manage to finish 50 of these packs.

So what is do you need for your Snowman Soup?
  • Package of Hot Chocolate
  • Small Candy Cane
  • Hershey Kisses and
  • Mini Marshmallows
I used the digital stamp "Frosty Cup of Cocoa" from Sassy Cheryl Stamps. I opened the image in PowerPoint and was able to fit 4 of the images onto a single 8.5 x 11 page. I added the recipe for snowman soup above each image which I then printed out on quality white card stock. I coloured each of the 4 images with my Copic markers.

Now before you say anything, I did not colour 50 of the snowman images. I coloured one page, then used our printer/scanner to copy out the rest of the copies.

I trimmed down the image and backed it with red card stock.

I bought 4x6 bags from Michaels (baking section) to hold the soup ingredients. The marshmallows were put into a smaller sealed bag ($ store). Hopefully they will stay fresh a bit longer.


For the top of the bag I used more red card stock and created a tent fold that I stapled to the top of the bag. The white card stock was put through my Cuttlebug with the swiss dots embossing folder. I punch out the red (1.5") and the white (1.25") circles and added the sentiment on the banner which is from Your Next Stamp. Then I added the tails to the banner. 


After taking all of the pictures I felt that the banner was missing something. So on the final product we used a white gel pen to add dots on the red circle and faux stitching lines on the banner tails.

On the back of the treat the girl added a small return address label with "Merry Christmas" and their names. My girls really enjoyed creating these for their classmates.

Both of the girls took their treats to school with them today and I was told by my oldest that they were a big hit.

Challenges
Simon Says Stamp Monday Challenge: Stamp out 2013
Cute Card Thursday: # 299 Christmas Catch Up (finally getting caught up on that to do list, with my two helper elves we got all of the treats ready to give out to their classmates today).

Have a wonderful day and thank you for having a look what my girls and I have created.

Tracy

Saturday 14 December 2013

Just Hanging Around

The craziness that is my December is starting to have a light at the end of the tunnel. I am hoping that after this weekend, my long list will have a lot more "done" than "to do". Once the stores open today, I am off (kids in tow) to purchase gifts for my staff at work, mail those Christmas cards and parcels that have yet to be sent (sorry everyone if they are a wee bit late!), wrap some presents and finish the gifts for the kids teachers and classmates (the things I put myself through each year). With some help I should get through this. Of course that doesn't include the pile of laundry and house cleaning that will need get done in-between everything else.

This is a card I made earlier this week for one of my staff that welcomed her second daughter on Friday the 13th.  The digital image is from Sassy Cheryl called A Bear for All Seasons.

The paper is Carta Bella "Alphabet Junction".

The image is coloured using Copic markers.


The layout was inspired by a great sketch from Karen check it out at her blog The Sweetest Thing. I discovered her wonderful sketches and challenges just recently.


Challenges:
Sassy Cheryl: # 195 Ribbons and/or bows
Sweet Sunday Sketch Challenge: # 199
Ribbon Carousel: RCC88 Anything Goes

Here's hoping the snow doesn't slow me down too much today. Stay warm and good luck getting things checked off your lists!

Tracy

Friday 13 December 2013

Frosty Cup of Cocoa

The weather has definitely been right to enjoy a warm cup of cocoa. This is the first of two projects that I used this cute Sassy Cheryl image called "A Frosty Cup of Cocoa". The sentiment is from a My Favorite Things stamp "Heart Warmer Boy".

The paper is from Doodlebug Designs "North Pole". The snowflakes I picked up at Michaels are Recollections wood veneer. I added glue and sprinkled Glitter Ritz fine glitter. This has been my go to item for a lot of my holiday cards.


The image is coloured with Copics. I cut the snowman out and popped him up.


For the inside of the card I used a tag from Simple Stories Snap Christmas. I added glue and you guessed it more glitter to great a sparkling "whipped cream topping".


Enjoy the snow, snowman and my favourite winter thing HOT COCOA. Happy crafting everyone.

Challenges:
4 Crafty Chicks:  # 172 Food and Drink - I think it's obvious (hot cocoa!)
Ribbon Carousel: Anything Goes
Crafty Cardmakers: #106 Winter Fun but NOT Christmas/New Years (My winter fun is enjoying a hot cup of cocoa after playing in the snow - making a snowman)
Simon Says Wednesday Challenge: Let it Snow

Tracy

Baby It's Cold Outside!

This layout is for the November sketch Challenge at Two Scrapbook Friends. Shelby provided a fabulous sketch to work with. Of course I had to add an addition challenge by adapting it for two photos.


To make the layout work for two photos, I decided to flip the sketch sideways. I also added a few extra paper layers for balance and just because I can't help myself. I used a stencil and modelling paste on the background to create a bit of texture and contrast to the background paper.

The pattern paper is from an Echo Park collections called Winter Wishes. I think it was one I purchased last year, of course with every intention of using it right away. 

The letters are DIY Thickers. I added blue glitter that I have had in my stash for ages.


I used my Cricut Simply Charmed cartridge to cut out the hat and mitts. This is a cute cartridge but I really don't like the faces that cut out on these image. To get around that, I cut the background using the shadow of the image, then the pattern paper is cut using the main layer. I didn't need to use the "face" layer.

I cut a second layer from white card stock and cut off the ball and trim portions of the hat. I ran this through my Xyron and added Sparkling Fluff.

 I repeated this for the mitts then added twine.

Thanks for taking a peek at my newest layout. Happy scrapping!

Tracy

Wednesday 11 December 2013

Need a Tissue?

I created these tissue box covers to give as a give to my kids teachers. It's a nice decorative way to brighten up a boring tissue box during the cold winter months.

I found the directions on creating the box over at Split Coast Stamper. You can check out the tutorial here. There is also a great video available to see how the box comes together.

I used pattern paper to decorate the sides and added trim with a border punch for the lid.

I embossed and inked my top panels for the box. I again added a punched border to decorate the lid.

Challenges:

Simon Says Monday Challenge: Tissue - the literal inspiration for this challenge

Simon Says Wednesday Challenge: Let it snow

All Sorts Challenge: Week 236 - Anything but Christmas

Thank you for stopping by and checking out my creation. Happy crafting.

Tracy


Sunday 8 December 2013

Santa's Coming to Town

If you are looking for the Two Scrapbook Friends Songs of Christmas Blog Hop click HERE.

This card was a challenge for me because I struggle so much with clean and simple. I love the looks of CAS cards (when other people create them) however I can't seem to make these cards myself. With this card however, I loved the results. I think it something about using the Distress inks that makes everything so much fun and look great.

For this card I first stamped the scene of houses, then masked that area to keep the look of snow and lights in the houses. I then used my Distress Ink on the top to create a night sky (using Broken China and Faded Jeans). After, I stamped my Santa Sleigh images.

To create the snow along the bottom, I used a sheet of double sided adhesive and cut out a shape that resembled a snow bank. I then added Glitter Ritz Micro fine white glitter to the top of the adhesive. 

To give the sky a "snowing" effect, I sprayed the panel with Perfect Pearls Mist.

I used dimensional adhesive before adhering the panel to my card base.


Stamp: Inkadinkado Holiday Silhouette 
Ink: Memento Tuxedo Black
Perfect Pearls Mist, Glitter Ritz Microfine Glitter

Challenges:
Simon Say Wednesday Challenge: Make Your Own Background (done with distress ink)

Little Red Wagon: # 214 Here Comes Santa - I hope this counts for featuring Santa, I mean who else would be flying through a snowy night in a sleigh pulled by reindeer.

Thanks for taking a look at my CAS distress card. Happy crafting everyone.

Tracy

Friday 6 December 2013

Songs of Christmas Blog Hop

Welcome to the Songs of Christmas Blog Hop with Two Scrapbook Friends!  You should have arrived here from Joanne's blog.


Our Blog Hop is all about the Songs of Christmas and the inspiration for my project comes from the song "Rockin' Around the Christmas Tree."

I was so excited to be a part of this blog hop that my inner crafting elf took control and I created 2 cards. Since I couldn't decided which card I liked best, I am going to showcase them both.

For my first card, I used the fabulous Countdown to Christmas collection from Bazzill. I really love the bold colours and fun prints in this collection. The adorable image is a digi from Sassy Cheryl called "It Takes One to Know One."


The image is coloured with Copics. I added Glossy Accents to the Christmas bauble and a bit of Glitter Ritz fine glitter to the trim of the tree. The sentiment is from a Kraftin' Kimmie stamp set called "Just Chillin".


The inside sentiment is from Your Next Stamp and the tree is Hero Arts.


On my second card I used Simple Stories December Documented. I LOVE Simple Stories and this collection is amazing. There are so many great colours and patterns; I have used this line on a number of holiday cards. The image is from a Kraftin' Kimmie stamp set called "Christmas Cheer". Isn't she cute? She is definitely rockin' that tree!


This image is coloured with Copics. Again I added Glossy Accents for the baubles and distressed everything with vintage photo Distress ink.


If you've seen my cards before you will know a card for me is not fully complete without the inside being decorated. So, the best way to "Rock" any Christmas tree is............PRESENTS!


Inside I created a present pop up using scraps of paper and ribbon. I heat embossed the Merry Christmas sentiment (Hero Arts) and the tag sentiment is from a 3x4 cut apart sheet in the December Documented collection.

Thank you for checking out the Songs of Christmas Blog Hop. I hope you find some inspiration to create your own Rockin' holiday projects!


So remember, in order to be entered to win the special prize all you have to do is hop from Blog to Blog and leave a comment on each as you go.  Then simply check back at the Two Scrapbook Friends blog on December 10th to see if you are the lucky winner!

Here are the featured blogs in our Blog Hop:

Tracy (me!!)

Your next blog to visit will be: Jayne.  Have fun hopping and Happy Holidays!

Tracy

Tuesday 3 December 2013

Warm Winter Cocoa

My photography lessons (with the hubby) continue. I now realize, it is not as simple as point, click and done. My husband has been very good repeating those key things I should remember (ISO, aperture, shutter speed, light, external flashes............). I really am trying to get what all these things mean. As long as he doesn't mess with the settings on the camera (in between my cards) all would be fine.

Thank you again to my dear husband for this week's lesson: 
  • I must remember to turn the external flash on before taking a picture,
  • If the picture is too dark, turn that dial "thingy" to a lower number and try again and,
  • The flash will turn off if I take too long trying to set up my picture! 

Now onto my card! This is a super cute image from Sassy Cheryl called "Warm Winter Cocoa". I fell in love with this image the moment I saw it.


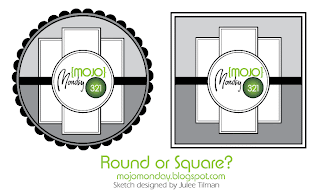
Although I didn't finish the card in time, the layout of this card is based on the Mojo Monday sketch # 321. 


The card is coloured with Copic markers.


Supplies:
Image: Sassy Cheryl "Warm Winter Cocoa"
Paper: Fancy Pants Merry Little Christmas
Ribbon and gems are from Michaels.

Challenges:
Sassy Cheryl: # 194 Anything Goes
Simon Says Wednesday Challenge: Anything Goes
4 Crafty Chicks: # 170 Christmas
Cute Card Thursday: # 297 Anything goes
Allsorts Challenge: 235 Inspired by a Christmas Song or Carol (Mine is inspired by the carol "It's a Marshmallow World"


Stop by the Two Scrapbook Friends blog on Friday December 6 (11:00 am) and check out the Songs of Christmas Blog Hop. See what Christmas Carols inspired the Design team and Friends.  Leave a comment on each of the blogs along the hop to qualify to be in a draw for a prize from Two Scrapbook Friends.

Thanks for stopping by and checking out my latest card. Happy crafting!

Tracy