Wednesday, 2 December 2015
Your Next Stamp 12 Days of Giving - Advent Calendar
Hello everyone! I am hosting over on the Your Next Stamp blog for day 2 of our newest blog series, the 12 Days of Gift Giving. Yesterday Thanh started off our gift ideas with a fabulous gift bag featuring the popper dies.
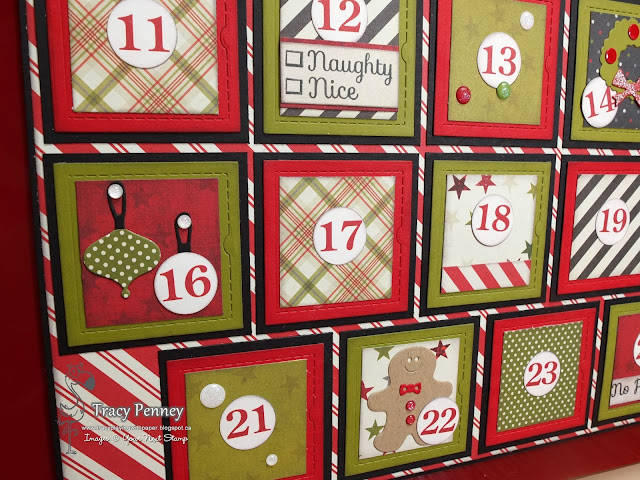
Today, I am excited to share with you an Advent Calendar I made for my daughter's using the Little Peek a Boo Door dies. I created the calendar to be 12 x 12 in size. Once the kids are finished with the Christmas countdown, I will add the Advent Calendar to my scrapbook album.
To make this calendar I used the square die from the Little Peek a Boo Door dies. I separated the pieces of the die removing the scallop. I used the inner squares which measures 2 inches square. I cut strips of paper in red and green just wider than 2 inches, to make my die cutting a little easier.
I cut 12 red and 12 green door using the two inner dies of this set.
To mat the doors, I cut 24 squares from black cardstock, which measured 2.25 inches.
Using my computer (in Word), I created a table with squares that were just under 2 inches square and typed up my list of Advent activities.
Use your paper trimmer to cut out each of your activities and adhere them directly to the black cardstock.
For your door, use 1/8 inch score tape and add adhesive around the outer edge of your die cut door piece. Be very careful not to apply the tape over your perforated line. You can also use liquid glue, however you will need to apply it very carefully. You don't want it leaking under the portion of the door that needs to open.
Adhere a strong adhesive to the back of your activity (black cardstock) piece and stick this down on your background page in your desired order. To assist with the planning for each days surprise I organized everything on my calendar, then I planned out the order on the advent calendar. Some of the activities include making things or finding a present, so I want to make sure I am prepared for those days. It also allowed me to plan for some of the more involved actives (i.e. baking, crafts watching movies and extra technology time) to fall on the weekend or during Christmas holidays.
Decorate the doors before you adhere them to your calendar.
Here is a look at my full 24 day Advent Calendar. I used both 12 x 12 and the 6 x 6 paper from Simple Stories Claus & Co. The numbers were from a collection called Dear Santa from Photoplay. You could also use stickers, stamps or die cut the numbers.
In addition to the patterned paper, I decorated the doors using various stamps, dies and of course yummy Holly Jolly Sparkly Gumdrops.
YNS Supplies: Stamps: Holiday Sentiments, Sprinkles Knit Happens (Winter hat), Cup of Cheer, Dies: Little Peek a Boo door, Mini Gingerbread Boy and Girl, Front Door (wreath), Mini Ornaments, Sled with Presents and Winter Mitten (snowflake).
Each day the girls will have a fun activity or treat to enjoy.
I will be taking pictures of each day's Advent surprise. Later I will include the calendar and the photos in my scrapbook.
This is a great way to change up your count down to Christmas, using the Little Peek a Boo Door dies. Stop back tomorrow to check out the inspiration that Sue will be sharing.
Have a fabulous and crafty day.
Tracy
Subscribe to:
Post Comments (Atom)


So cool, Tracy!!
ReplyDeleteHello Tracy,
ReplyDeleteWhat did you make a great advent calendar, really awesome.
Kind Regards,
Petra