Showing posts with label Altered notebook. Show all posts

Friday, 24 February 2017

Your Next Stamp Sketch/Colour Challenge # 58 - Silly Book Monster (Altered Notebook)

Hello and welcome to another week of the Your Next Stamp sketch/colour challenge #58. 

Every two weeks, there is a new challenge that features a sketch and colour inspiration. Pick the one that inspires you most, or try both for an added challenge. The best part of these challenges is you could win a gift certificate to the YNS store!

 When using the colour inspiration, you must use at least 3 colours. You may also add neutrals

This week I used the sketch for my inspiration. This was a great sketch, so I didn't need to make any changes. I inked up one of my new favourite stamps, the fun Silly Book Monsters and decorated a notebook.


I also used the fun Letterboard die to create my book title.


For the sketch/colour challenge # 58, you will have until Thursday March 2nd (midnight EST) to play along. Head over to the Your Next Stamp blog for more inspiration and to link up your creation.

One random participant will win a $15 gift card to the YNS store. If you feature YNS products (it must be the main focus of your project), you will receive an additional $5. When you use a YNS stamp/die, there is a chance of being selected as the YNS top pick. The winner and top pick are announced on the YNS blog, the Sunday after the close of the challenge.

If you use YNS products on your project, you can also take part in the YNS Social Media challenge. Simply showcase your YNS sketch/colour challenge #58 project on Instagram, Splitcoast Stampers or Facebook. Check out the currently challenge post at the YNS blog for more details on the social media challenge.

Have a wonderful and crafty day!


Supplies Used:
Stamp: Book Monster
Dies: Letterboard Die, Circle Die, Stitching Mark Circle, Book monster die
Other: Love Me Some Latte Gumdrops
Ink: YNS Black Olive ink, Walnut Stain distress ink
Paper: My Minds Eye Remarkable

Wednesday, 26 October 2016

Notebook Full of Possibilities!

Hello everyone!

I am here with a rare blog post. This one is not connected with a new stamp release or one of my design team commitments. This challenge is BOOK related.

I am a HUGE fan of author Elise Kova. She is the talented author of the amazing Air Awakens series. She is soon to release the Alchemists of Loom in January 2015. As we build up to the release of the book Elise continues to share with us fascinating details about this amazing world of Loom.

Did you know there are Guilds in the world of Loom?

I am a proud member of the Harvester Guild


You can find out more about the Harvesters Guild here. You learn more about the Guild Games and determine which guild you are part of here.

I used my craft resources to create this note book. I coloured the image (Elisha the Mage by Kraftin' Kimmie Stamps) and decorated the book using a variety of supplies in my craft stash.

The tag on the front of the note book is a sentiment that I feel represents me and the Harvesters really well.

I love to make notebooks. They are great ways to record ideas, lists, creations or they make a great gift. I haven't decided what I am going to do with this special notebook!


Thank you for stopping by.

If you want to learn more about Elise Kova's books check out her website.


Wednesday, 20 May 2015

Kraftin' Kimmie Stamps (Wonderful Wednesday) / Little Red Wagon (To Die For)


Welcome friends. Today I have a dual post for Kraftin' Kimmie Stamps and Little Red Wagon.


Did you know the Wonderful Wednesday challenges at Kraftin' Kimmie Stamps are ANYTHING GOES? We love when you use a KKS (and it doubles you chance for winning), however all stamps are welcome for these challenges. Just create a NEW card, layout or altered item and share with us over at the Kraftin' Kimmie Stamps blog or in our Facebook group (here).

The challenge runs for the month and there is a new chance to enter each Wednesday. At the end of the month a random winner will be chosen from the submissions and received a $20 gift card to the shop. Definitely worth playing for right?

This week at Little Red Wagon,


Susie is issuing the orders and her challenge this week is to DIE FOR! No really it's actually to DIE FOR. Susie wants us to use a die on our projects. Manual or die cutting machine your choice.

I am still having fun with a few altered projects and this week I decorated a small note book I picked up at Michaels (approx size 3x5 inches). I used the new ITTY BITTY FRIENDS from Kraftin' Kimmie Stamps. These mini images are great for these little projects.

My die cuts are simple. I used the Stitched Circles die (YNS) around my image and I created a matching bookmark for my notebook using a Bookmark die (YNS).


The paper used on the notebook is Simple Stories Enchanted.


I hope that you find time to join our TO DIE FOR challenge over at Little Red Wagon. While you are there stop over to the other Girlfriends blogs to see all of the inspiration they are sharing. Check out our Little Red Wagon Facebook group (here).
--------------------------------------------------------------------------

As the Kraftin' Kimmie Stamps Wonderful Wednesday challenge is anything goes, there really is no reason for you not to play along. Check out the blog for details.

If you want to stay up on the Krafty happenings, chat and share your Krafty Creations, join our Facebook group (here). If you want to see the ITTY BITTY FRIENDS and more of the May release images check out the shop (here)

Thanks for stopping by today and have a fabulous day!


Monday, 6 April 2015

Kraftin' Kimmie Stamps - Note Holder Tutorial (4 x 5.5 note pad)


Today I am sharing my tutorial over on the Kraftin' Kimmie Stamps blog on how to create this book style note holder.

Some of the supplies you will need include:
  • Note Pad - this one is 4 x 5.5 inches
  • Sturdy cardstock for the base - 110lb white cardstock 
  • Pattern Paper and coordinating cardstock (if you like to layer)
  • Stamp -  Kraftin' Kimmie Stamps Smarty Pants
  • Embellishments
This style of note holder is really easy to make and can be modified for different size note pads. You just need to do a little planning to figure out the size of your base and where to score.

Your first step is to measure the length, width and depth of your notepad.


This notepad measures 4 by 5.5 by 0.25 inches.

You want the width of your note holder to be larger than the notepad. My front and back cover will measure 4.5 inches. I then added 0.5 inches for the depth of the note pad (this is to account for the layers that will be added when I decorate the holder). 

The cardstock base I started with is 8.5 x 9.5 inches.

Along the 9.5 inch side of your cardstock score at 4.5 and 5 inches.


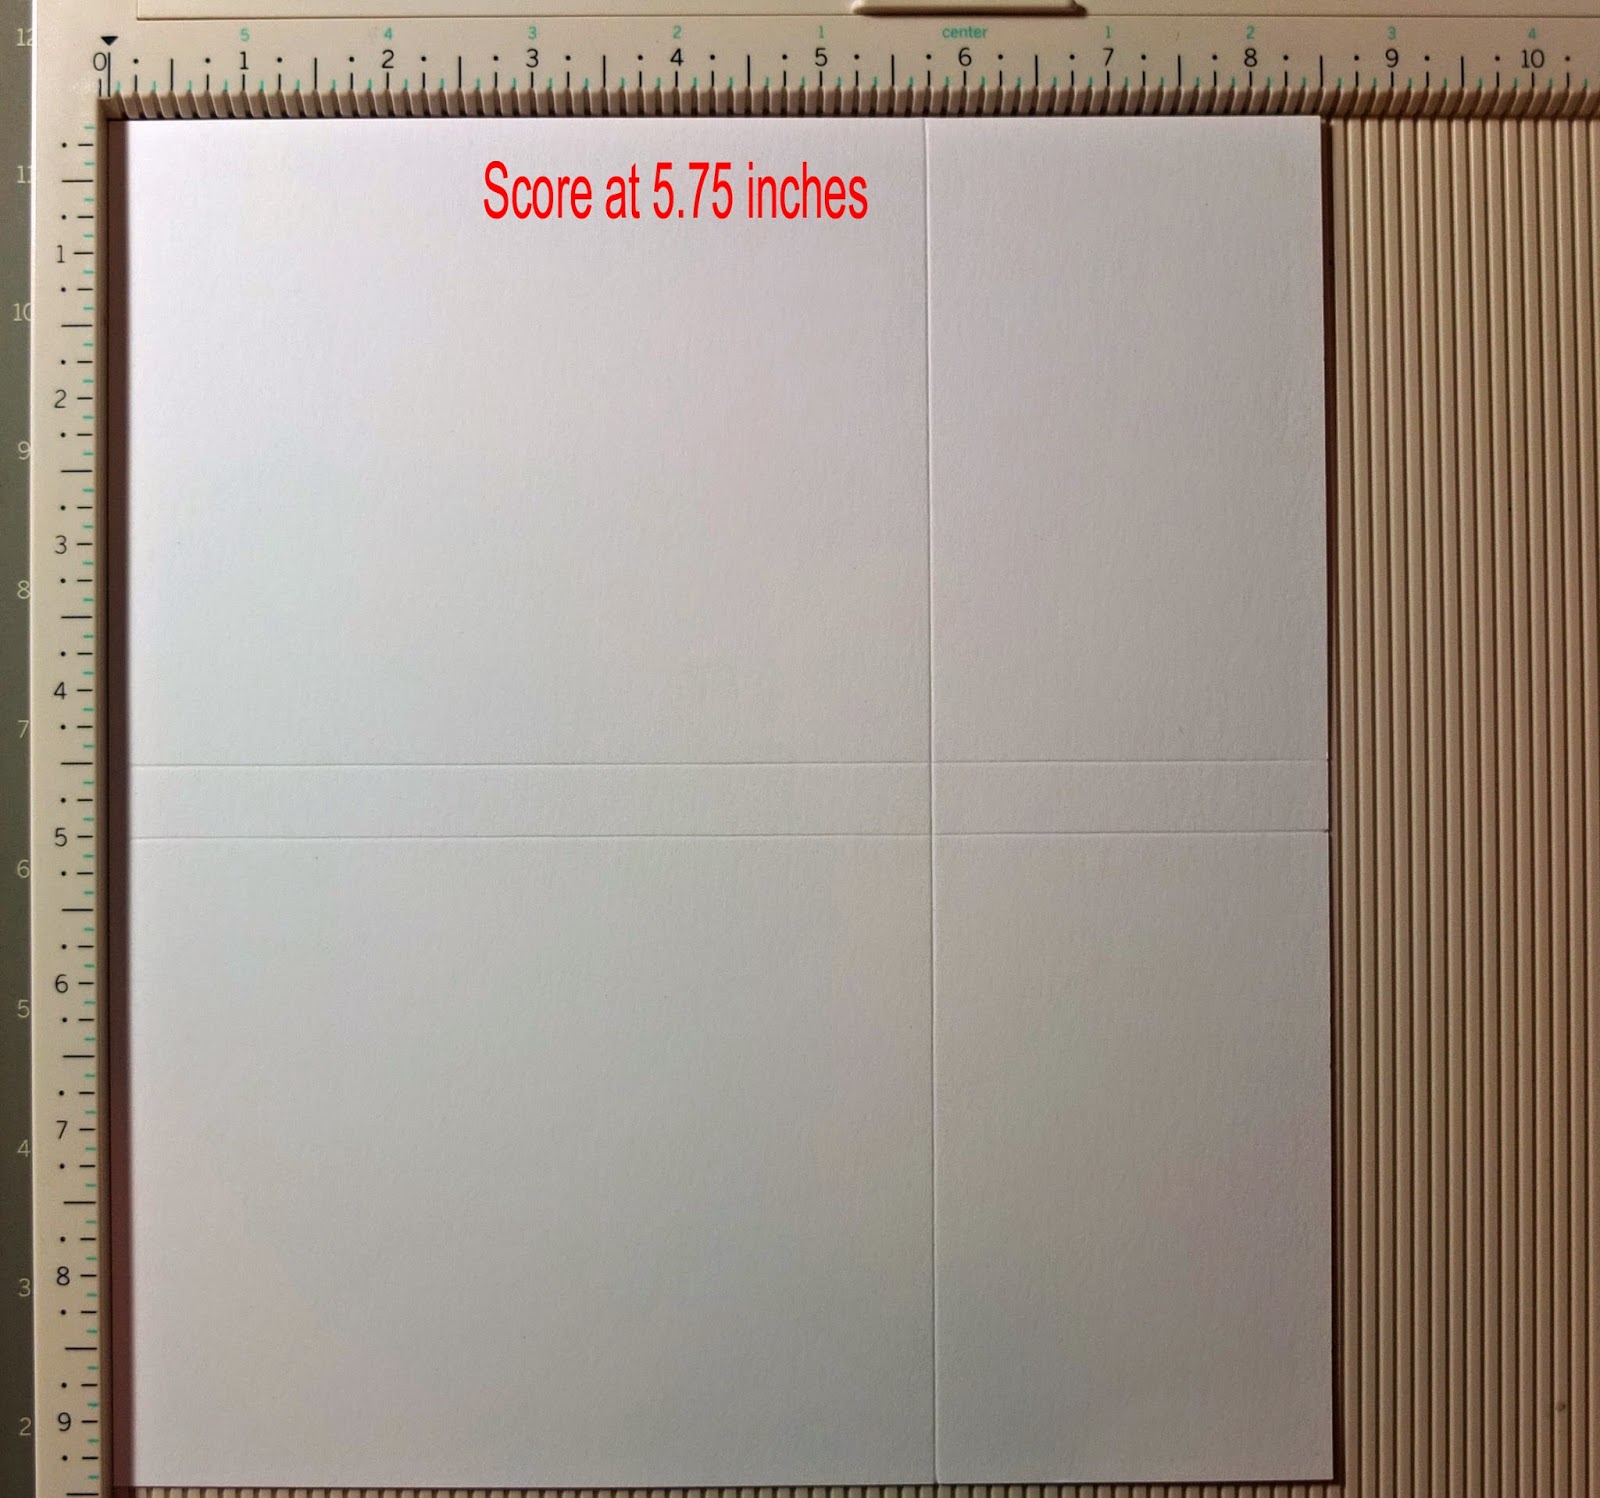
Along the 8.5 inch side of the cardstock, score just longer than the length of the notepad. I scored at 5.75 inches. This is to create a pocket for the notepad to slide into.


This is what your note holder will look like after you fold it.


From here you can start to add some of your layers to decorate.

The sizes for the basic layers of cardstock and pattern paper are:
  • 2 cardstock @ 5 5/8" x 4 3/8" and 2 pattern paper @ 4 1/4" x 5 1/2" (front and back cover)
  • 1 cardstock @ 5 5/8" x 3/8" and 1 pattern paper @ 5 1/2" x 1/4" (outside spine)
  • 2 cardstock @ 4 3/8" x 3 1/4" and 2 pattern paper @ 4 1/4" x 3 1/8" (inside top panels)
  • 2 cardstock @ 4 3/8" x 2 5/8" and 2 pattern paper @ 4 1/4"  x 2 1/2" (inside bottom panels)
  • 1 cardstock @ 3 1/4" x 3/8" and 1 patter paper @ 3 1/8" x 1/4" (inside top spine)
  • 1 cardstock @ 2 5/8" x 3/8" and 1 patter paper @ 2 1/2" x 1/4" (inside bottom spine)
Start with your inside and adhere the top panels first. To help create your pocket for the note pad, add a strip of score tape to the middle spine (bottom) portion of your base.  


After the top inside panels are decorated and the centre taped down, staple close to the edge on each side of the holder to create the pocket. I used my Tim Holtz tiny attacher, however regular staples would be fine. The staples will be hidden by the rest of the layers. You could also sew along the edge after putting your pattern paper down for added decoration.


Now you can finish adding the remaining layers on the inside.


Then you can add an image, additional layers and embellishments to the front of your note holder.


The back is also decorated to hide those staples and finish off the look of the note pad holder.


Here is a look at the inside with the notepad. 


Here is a similar style note holder for a 5 x 8 x 0.25 inch note pad. This one is decorated with Pippi from the Book Pals stamp set.


For this note holder I started with a 11 x 12 inch sheet of cardstock.

Along the 11" side score at 5.5" and 6".
Along the 12"side score at 8.5"

Thanks for stopping by today. Head over to the Kraftin' Kimmie Stamps blog to check out more great Tips and Tutes from the Krafty Girls.

Have a wonderful and Krafty Day!

Tracy

Sunday, 15 March 2015

Kraftin' Kimmie Stamps March Release Blog Hop


Welcome to the KRAFTIN' KIMMIE STAMPS March release blog hop. Let's get comfy, grab your favourite drink and enjoy the hop.

This month we have shared an amazing collection of stamps. We started of the previews with a fun fantasy set featuring ELISHA THE MAGE and KIERSTEN THE KNIGHT. These are of course my favourite of the release as they were named after my daughters. The girls were super excited to hear the news about the stamps and my daughter Kiersten is now considering herself famous!


Next up was our beautiful RAIN OR SHINE sentiment set.


On Friday we showed a lovely and sweet set of seniors, showing that they are truly YOUNG AT HEART.


Finally, was our cute spring set with our darling kids called SPRINGTIME FRIENDS.

Today I am used KIERSTEN THE KNIGHT to make a personal gift for my daughter. She loves to create and draw, so this is a doodle book for her to use. Just as her sister's altered clipboard (here) I used the We R Memory Keepers Storetime paper for the book.


Here is a look at Kiersten in her gold armour.


I created a double flap book style note holder. The inside flaps have pockets at the bottom.


On one of the panels I added a small paper bag.


The note holder fits a 5x8 inch pad of paper.


Here is the back of the note holder.


Thanks for joining our March release hop. Today as you continue on your hop you will get to see all of the new March images being showcased. As you are going along remember to leave a comment. One lucky Krafty Friend will win a gift card to the shop.

All of the new March stamps are available in the shop today after noon (EST).

Coffee Card Kits
Have you seen these amazing Kits. The first round of pre-orders sold out quick. Due to the excitement of these amazing Kits, Kimmie is opening up for further pre-orders (TODAY). There will only be a limited number of kits available. The kits include an amazing LIMITED EDITION I {Heart} Coffee stamp! I don't know about you, but I do {heart} my coffee. If you are wondering what these kits look like, some of the Krafty Girls are sharing cards along this hop.

Enjoy the rest of the Kraftin' Kimmie Stamps release hop.

Tracy

Saturday, 7 March 2015

Your Next Stamp - March Sneak Peek!


Can you believe that we are already into March? Do you still have lots of snow? I sure do, however I am staying warm and dry in my crafty cave, playing with some fun new stamps.

Today I am excited to share a sweet project featuring one of the new YOUR NEXT STAMP images that will be available this month. By this month, I mean tomorrow! The Design Team is offering up a fabulous SNEAK PEEK of this months amazing stamps and dies. Head over to the YNS blog to see a full list of all the designers with projects to share.

Today, I am excited to be showing off one of the new images, that is now one of my newest FAVOURITES. I am excited to share the sweet ADORKABLE stamp set. This little bookworm is just the cutest and she works so well on my latest notebook holder. I also dug into my YNS dies and used the LETTER BOARD DIE to create my "notes" title.


The ADORKABLE set included a cute girl and boy stamp that you can accessorize with glasses.


You may have noticed that I am on a bit of a kick making altered notepads. This 4 x 5.5" note pad holder is a book style with a double flap for extra storage.


The cute paper is My Minds Eye, Notable 6x6 paper pad. On the inside of each book flap I added a small brown paper bag (Recollections Michaels) for storage. The bags were a little to long for the note holder, so I folded them to fit the book.


A view of the note holder when it's open.


To allow for longer use of the note holder, I created a pocket for the notepad to slid into. This way  you can just refill with a new pad when the time comes.


I hope you enjoyed our little sneak peek for the YOUR NEXT STAMP March release. Remember to check out all of the previews available from the DT. The complete list is on the YNS blog.

Don't forget to come back tomorrow to join our March release blog hop. There will be a lot of amazing project to see You really don't want to miss anything. Then stop back on March 11 for the latest YNS Design Team Dare!

Happy PEEKING everyone!

Tracy