Showing posts with label Book style note holder. Show all posts

Thursday, 10 December 2015

Your Next Stamp December Release Blog Hop


Hello and welcome to the Your Next Stamp December new release blog hop.

This month we are featuring a variety of stamps, including cute animals, fun backgrounds, and my favourite LOTS of coffee related goodies. The dies this month are wonderful too, including a sweet treat box and long awaited stitched oval dies!

This release there is theme to my projects. I am still working on a few final handmade gifts and this month I made a number of new decorated notepad holders. They make a great gift for a teacher, boss, and friends. My first notepad holder, is one made for 3x3 sticky notes. I used the cute Word Critters Cats and Dogs set to decorate this easel style note holder. The paper is Simple Stories We Are Family.


I fussy cut the darling cat and hung him from the heat embossed sentiment. I used embroidery thread to create a ball of yarn to decorate the holder.


The back of the note holder was also decorated.


Here is a look at the stamp set used:


For my second project, I made a book style cover for a 5 x 8 inch notepad and decorated using the fabulous and fun Java Geek and Coffee Rings.


I paper pieced the cute coffee take away cup and featured it on the pattern paper cut using the stitched oval dies. The coffee title was heat embossed on navy cardstock using white embossing powder.


Here is a look at the inside of the holder. I created pockets to hold the notepad, so they can be changed out when they are empty.


Here is a look at the stamp and dies used:


In celebration of this month's release, Karen has a fabulous deal for you.


Thanks for hopping along with us today. Remember to leave a comment on each of the blogs as you go. There is a fabulous prize available to one lucky stamps ($25 YNS gift certificate). All of the blogs are listed below. The hop continues until December 14th (EST) at midnight. Come back and join us on November 14th to see the winner from the blog hop comments and check out the latest Design Team Dare.

Have a great day, happy hopping.


Saturday, 4 July 2015

Your Next Stamp July Sneak Peek

Today I am excited to share a peek of one of the new stamps from the YOUR NEXT STAMP July release. The Design Team is offering some fabulous PEEKS today, so sit back and enjoy! For the full list of preview projects this months, head over to the Your Next Stamps blog.

For my peek project, I used a super cute frog from a set called STICKY NOTE! Now with a name like that I knew I had to make another note holder. It has been a few months (I think), since I've made one. I used the coordinating die to cut out my frog image and adhered him to a background made with the STITCHED RECTANGLE DIES. I am a huge fan of all the stitched dies. They just add a little something extra to your card without actually sewing. WIN!


The fun summer paper is a new Pebbles collection called Fun in the Sun.


Here is a look at the inside of the note holder. I only created one pocket on this holder for the paper. The other side is open for a personal message for the receiver.

I stamped onto the paper the other adorable frog from this set. And yes, I did stamp every page!


The pad of paper comes out so the pad can be refilled.


Enjoy our little preview of the YOUR NEXT STAMP July release. Remember to check out all of the previews available from the DT. The complete list is on the YNS blog. Stamps and dies from the new release will be available tomorrow, Sunday July 5th. 

Stop back tomorrow, to join our July Release Blog Hop. There will be a lot of amazing projects to see and a prize to be won. You don't want to miss this release. On June 8th we also have our next DT dare and another chance to win a prize.

Happy PEEKING  everyone!

Monday, 6 April 2015

Kraftin' Kimmie Stamps - Note Holder Tutorial (4 x 5.5 note pad)


Today I am sharing my tutorial over on the Kraftin' Kimmie Stamps blog on how to create this book style note holder.

Some of the supplies you will need include:
  • Note Pad - this one is 4 x 5.5 inches
  • Sturdy cardstock for the base - 110lb white cardstock 
  • Pattern Paper and coordinating cardstock (if you like to layer)
  • Stamp -  Kraftin' Kimmie Stamps Smarty Pants
  • Embellishments
This style of note holder is really easy to make and can be modified for different size note pads. You just need to do a little planning to figure out the size of your base and where to score.

Your first step is to measure the length, width and depth of your notepad.


This notepad measures 4 by 5.5 by 0.25 inches.

You want the width of your note holder to be larger than the notepad. My front and back cover will measure 4.5 inches. I then added 0.5 inches for the depth of the note pad (this is to account for the layers that will be added when I decorate the holder). 

The cardstock base I started with is 8.5 x 9.5 inches.

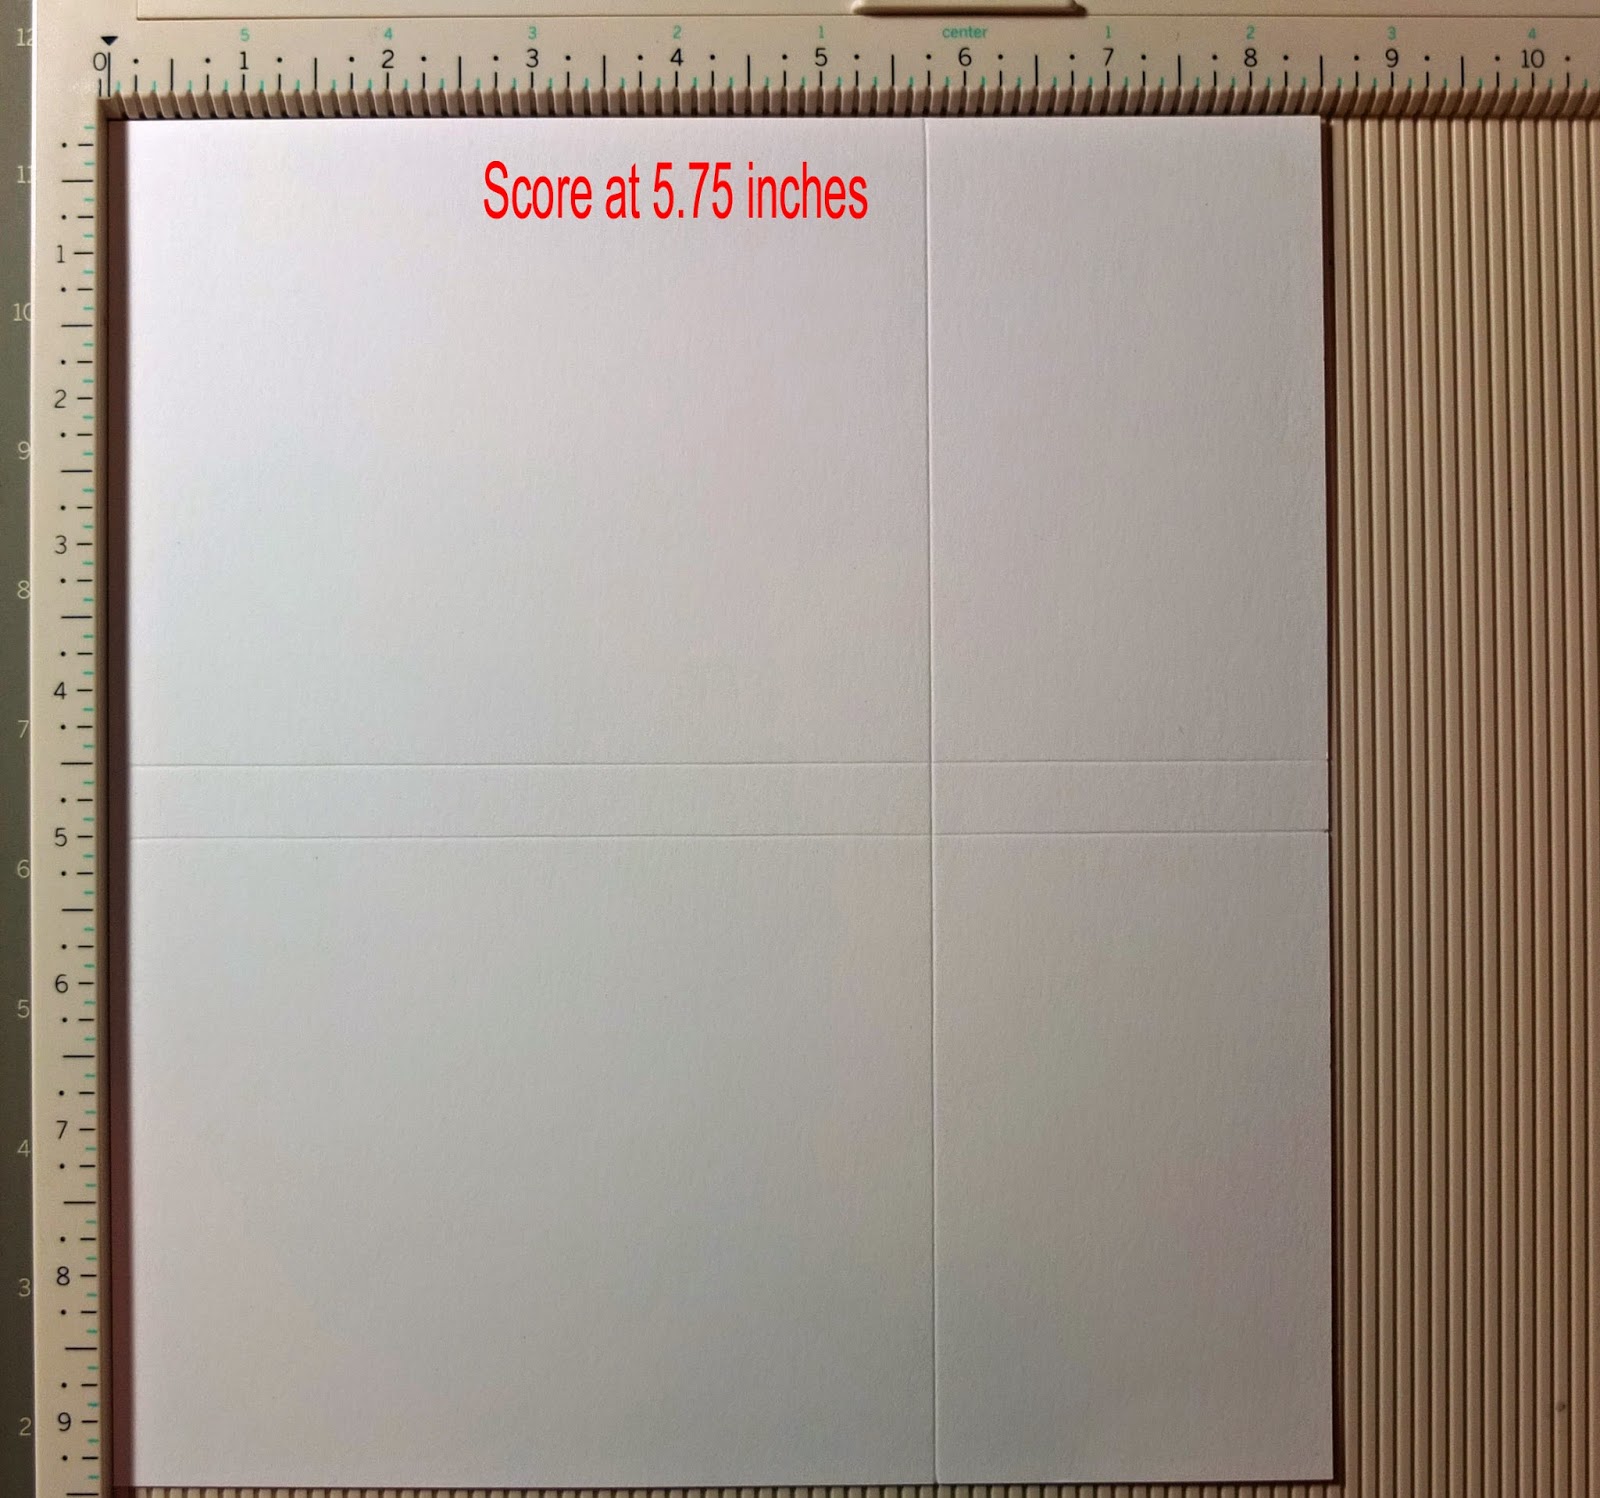
Along the 9.5 inch side of your cardstock score at 4.5 and 5 inches.


Along the 8.5 inch side of the cardstock, score just longer than the length of the notepad. I scored at 5.75 inches. This is to create a pocket for the notepad to slide into.


This is what your note holder will look like after you fold it.


From here you can start to add some of your layers to decorate.

The sizes for the basic layers of cardstock and pattern paper are:
  • 2 cardstock @ 5 5/8" x 4 3/8" and 2 pattern paper @ 4 1/4" x 5 1/2" (front and back cover)
  • 1 cardstock @ 5 5/8" x 3/8" and 1 pattern paper @ 5 1/2" x 1/4" (outside spine)
  • 2 cardstock @ 4 3/8" x 3 1/4" and 2 pattern paper @ 4 1/4" x 3 1/8" (inside top panels)
  • 2 cardstock @ 4 3/8" x 2 5/8" and 2 pattern paper @ 4 1/4"  x 2 1/2" (inside bottom panels)
  • 1 cardstock @ 3 1/4" x 3/8" and 1 patter paper @ 3 1/8" x 1/4" (inside top spine)
  • 1 cardstock @ 2 5/8" x 3/8" and 1 patter paper @ 2 1/2" x 1/4" (inside bottom spine)
Start with your inside and adhere the top panels first. To help create your pocket for the note pad, add a strip of score tape to the middle spine (bottom) portion of your base.  


After the top inside panels are decorated and the centre taped down, staple close to the edge on each side of the holder to create the pocket. I used my Tim Holtz tiny attacher, however regular staples would be fine. The staples will be hidden by the rest of the layers. You could also sew along the edge after putting your pattern paper down for added decoration.


Now you can finish adding the remaining layers on the inside.


Then you can add an image, additional layers and embellishments to the front of your note holder.


The back is also decorated to hide those staples and finish off the look of the note pad holder.


Here is a look at the inside with the notepad. 


Here is a similar style note holder for a 5 x 8 x 0.25 inch note pad. This one is decorated with Pippi from the Book Pals stamp set.


For this note holder I started with a 11 x 12 inch sheet of cardstock.

Along the 11" side score at 5.5" and 6".
Along the 12"side score at 8.5"

Thanks for stopping by today. Head over to the Kraftin' Kimmie Stamps blog to check out more great Tips and Tutes from the Krafty Girls.

Have a wonderful and Krafty Day!

Tracy